
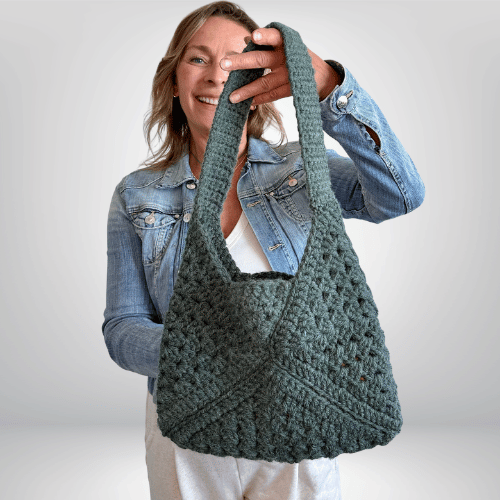
Not So Granny Bag Crochet Pattern – A Modern Take on Granny Squares
If you love the charm of granny squares but want something a little more modern, the Not So Granny Crochet Bag Pattern is the perfect project to make next.
This design was inspired by the classic granny square — but with a fresh, updated twist that feels fun, stylish, and totally wearable for everyday life.
Whether you’re heading to the beach, running errands, or meeting friends, this crochet bag adds the perfect handmade touch to any outfit.

✨ The Inspiration Behind the Not So Granny Bag
I’ve always loved granny squares—they’re timeless, creative, and full of personality.
At the same time, I wanted to design something that felt a little less traditional and more like something you can grab and wear anywhere.
So, I took that classic granny square concept and gave it a fresh update—creating a crochet bag that keeps that nostalgic charm while feeling modern and bold.
I also wanted to give you flexibility with the straps. You can crochet your own for a fully handmade look, or switch it up with a colorful adjustable strap to add a fun, personal touch.
As a result, the Not So Granny Bag is the perfect blend of classic crochet and modern, everyday style.

Design Details You’ll Love
This crochet bag pattern is designed to keep things simple, fun, and beginner-friendly.
Here’s what makes it special:
- Granny square–inspired design with a modern twist
- Easy construction that’s relaxing to make
- Perfect for using multiple colors or keeping it simple
- Make your own strap or opt for a colorful adjustable one
- Lightweight yet practical for everyday use
- Great for confident beginners and beyond
In addition, the design gives you the freedom to play with color.
For example, you can go bold with bright, contrasting shades for a statement piece, or keep it neutral for a more classic, everyday look.

Easy Construction
This bag is all about keeping things simple and enjoyable.
You’ll crochet the granny squares separately, then join them together to form the bag—using 3 large squares and 2 smaller ones.
Because of this, the construction feels approachable and doesn’t require complicated shaping.
As a result, you get a beautiful, functional bag without the stress — just the fun part of crocheting.

Make It Your Own
One of my favorite things about this bag is how customizable it is.
You can easily:
- Mix and match colors
- Use leftover yarn from your stash
- Make your own strap or opt for a colorful adjustable one
- Add a fun tassel or charm
Above all, this design lets your creativity shine while still following a simple structure.

The Perfect Handmade Gift
If you’re looking for a crochet project that makes an amazing gift, this one checks all the boxes.
It’s practical, stylish, and has that thoughtful handmade feel people truly appreciate. Whether it’s for a birthday, holiday, or just because, this crochet bag is always a great choice.
Why You’ll Love This Pattern
The Not So Granny Bag is perfect if you want a project that’s:
- Beginner-friendly
- Stylish and modern
- Quick and satisfying to make
- Great for gifts or everyday use
Most importantly, it’s a fun way to take a classic crochet technique and turn it into something fresh and exciting.
🎥 Step-by-Step Video Tutorial
To make this crochet bag pattern even more beginner-friendly, I’ve included a full step-by-step video tutorial to guide you through the entire process.
So if you’re someone who loves visual learning, you’ll feel confident every step of the way.
Start Crocheting Today
Download the ad-free PDF crochet bag pattern and start crocheting your very own stylish crochet bag today!
ETSY
RAVELRY
You can get all the yarn you need to make your bag, along with the printable PDF pattern, in one convenient bundle from Lion Brand HERE.
Supplies Needed
The Yarn
For my Not So Granny Bag, I chose Lion Brand Hue + Me yarn, and it’s easy to see why it’s one of my favorites!
This bulky #5 weight yarn is soft, easy to work with, and available in so many beautiful, modern colors.
Its thickness gives the bag wonderful structure while allowing the stitches to stand out.
I also used Hue + Me for my Bomber Sweater and matching Downhill Beanie, as well as the Wrenley Hoodie and matching Wrenley Bulky Beanie. With so many coordinating projects, you can create stylish handmade sets in your favorite colors!
And let’s not forget the Amelia Bag, featuring its beautiful Long Wave Stitch!

I used Lion Brand Hue and me yarn. It is a bulky #5 weight, 80% acrylic, 20% wool, 4.4 oz. (125 g), 137 yd. (125 m).
You can get all the yarn you need to make your bag, along with the printable PDF pattern, in one convenient bundle from Lion Brand HERE.
Crochet Hooks
I used a smaller hook with this bulky yarn to create tighter granny square stitches, so there’s no need to line the bag.
Notions
Optional
Notes
- The granny square follows the basic granny square pattern but there is no ch 1 between each cluster, only the corners will have a ch 1, this makes the square tighter.
- The space between each cluster is referred as “sp”.
- A sc is worked instead of a slip stitch to join the round (square only).
- The two triangles are two small granny quarters.
- Once the size is reached for both square and triangle, a row of dc or sc will be worked around to make a border.
- While seaming, the back loop of the top piece will be facing you.
Pattern
GRANNY SQUARE – MAKE 3
Beginning ch 3 counts as first dc.
The (ch 3, 2 dc) counts as the first cluster.
Round 1: Starting with a magic ring (or ch 4, sl st to first ch to form a ring), ch 3, 2 dc, ch 1, *3 dc, ch 1*, rep from * to * 2 more times in ring, tighten ring and sc in 3rd ch of beg-ch. (4 corners made)
Round 2: (RS) Ch 3, 2 dc in same sp created by sc (sc-sp), *(3 dc, ch 1, 3 dc) in next ch1-sp*, rep from * to * 2 more times, 3 dc in same sc-sp as beg-ch, ch 1, sc in 3rd ch of beg-ch.
The space between each cluster is abbreviated sp.
Round 3: Ch 3, 2 dc in same sc-sp, *3 dc in the sp between the next 2 clusters (sp), (3 dc, ch 1, 3 dc) in next ch1-sp*, rep from * to * 2 more times, 3 dc in next sp, 3 dc in same sc-sp as beg-ch, ch 1, sc in 3rd ch of beg-ch. (4 cl and 4 corners)
Round 4: Ch 3, 2 dc in same sc-sp, *3 dc in each of next 2 sps, (3 dc, ch 1, 3 dc) in next ch1-sp*, rep from * to * 2 more times, 3 dc in each of next 2 sps, 3 dc in same sc-sp as beg-ch, ch 1, sc in 3rd ch of beg-ch. (8 cl and 4 corners)
Round 5: Ch 3, 2 dc in same sc-sp, *3 dc in each of next 3 sps, (3 dc, ch 1, 3 dc) in next ch1-sp*, rep from * to * 2 more times, 3 dc in each of next 3 sps, 3 dc in same sc-sp as beg-ch, ch 1, sc in 3rd ch of beg-ch. (12 cl and 4 corners)
Round 6: Ch 3, 2 dc in same sc-sp, *3 dc in each of next 4 sps, (3 dc, ch 1, 3 dc) in next ch1-sp*, rep from * to * 2 more times, 3 dc in each of next 4 sps, 3 dc in same sc-sp as beg-ch, ch 1, sc in 3rd ch of beg-ch. (16 cl and 4 corners)
The final round is a border of dc around the square.
Round 7: Ch 3, dc in same sc-sp, *dc in each st across, (2 dc, ch 1, 2 dc) in next ch1-sp*, rep from * to * 2 more times, dc in each st across, 2 dc in same sc-sp as beg-ch, ch 1, sc in 3rd ch of beg-ch.
- Fasten off and weave in ends.
TRIANGLES – MAKE 2
Beginning ch 3 counts as first dc.
Row 1: Starting with a magic ring (or ch 4, sl st to first ch to form a ring), ch 3, dc, ch 1, 2 dc in ring, turn.
Do not fasten ring too tight.
Row 2: Ch 3, (2 dc, ch 1, 2 dc) in ch1-sp, dc in 3rd ch of beg-ch, turn.
Corner made.
Row 3: Ch 3, dc in sp between ch-3 and next dc, 3 dc in next ch1-sp, 2 dc in next sp, turn.
The final row is a border of dc and sc around the triangle.
Row 4: (RS) Ch 3, dc in same st, dc in next 5 sts, dc in 3rd ch of beg-ch (8 dc). Continuing on to the side of the triangle towards the magic ring: ch 1, sc 6 evenly along the triangle side, (2 sc, ch 1, 2 sc) in magic ring, sc 6 evenly along the other side of the triangle, ch 1, slip st in 3rd ch of beg-ch. (16 sc and 3 ch-1).
- Fasten off. Tighten the magic ring if needed. Weave in ends.
- The triangle should measure approximately 3″ on all sides.
- The row of dc is the top of the triangle.
SEAMING SQUARES AND TRIANGLES
To form the shape of the bag, start by folding the squares with RS facing out.
Next, use the seaming technique described below to seam the squares and triangles together.
- Always ensure that the RS are facing each other while seaming.


SEAMING TECHNIQUE
With the RS facing each other, stack two squares on top of one another.
- Note: While the back loop of the bottom square remains unchanged, the back loop of the top square will be positioned in front of the square.
Seam the squares together using a whip st, carefully aligning the sts as you go;
With yarn and needle, insert the needle from back to front through the back loops of both pieces and pull the yarn through. Rep this process in each st across.
Use the same method to seam the triangles.
STRAP
- Lay the bag flat.
- Pick a corner where the strap will go, find the ch1-sp of the square, count 3 st to the right and attach the yarn, ch 1.


Row 1: Sc in same st as the yarn, sc in next 2 sts, sc in ch1-sp, sc in next 3 sts, turn. (7)
Row 2: Sc in first st and across. (No turning ch).
Row 3: Rep row 2 until desired length.
- Fasten off leaving a tail for seaming.
SEAMING STRAP
- With RS facing each other, place a marker through both the ch1-sp of the bag and in the middle st of the strap to keep the strap in place.
- (WS) With yarn and needle, whip st across through both loops of the bag and the strap, making sure to match the sts on both the bag and strap.
- Double st at beginning and end to make it more secure.
- Weave in ends.
Shoulder Length: 19″ long = 57 rows
Waist Length: 31″ long = 93 rows
Crossbody: 38″ long = 114 rows
The width of the strap is approximately 2 1/2″.
Need More Inspiration?
If you like working with granny squares, try the Tigerlily Tote. It’s a fun way to combine bold colors and use leftover yarn from your stash to create a unique, eye-catching bag.
You may also like the Seabreeze Tote, another fun granny square design made with raffia paper for a completely different look and texture.
If you love the look of wooden handles, the Chloe Crochet Bag or Brooklyn Crochet Bag may be perfect for you. Both are made with super-bulky yarn, creating stylish, sturdy bags that work up quickly.
For an ocean-inspired design, check out the Amelia Bag, featuring the beautiful Long Wave Stitch for a flowing, textured finish.
Affiliate Disclosure:
This post may contain affiliate links. If you purchase through these links, I may earn a small commission at no extra cost to you. Thank you for supporting Mermaids & Hooks and helping me continue to create free crochet patterns and tutorials.