
And that’s where the raffia came in!
The Inspiration Behind the Seabreeze Raffia Crochet Bag
After working with traditional yarn for my Tigerlily and Not So Granny bags, I wanted to play around with a completely different texture.
Raffia paper immediately caught my attention.
It has a beautiful natural look that feels perfect for a summer crochet bag. The finished fabric has more structure than regular yarn, which helps the bag hold its shape. Plus, that slightly rustic texture gives every granny square a little extra character.
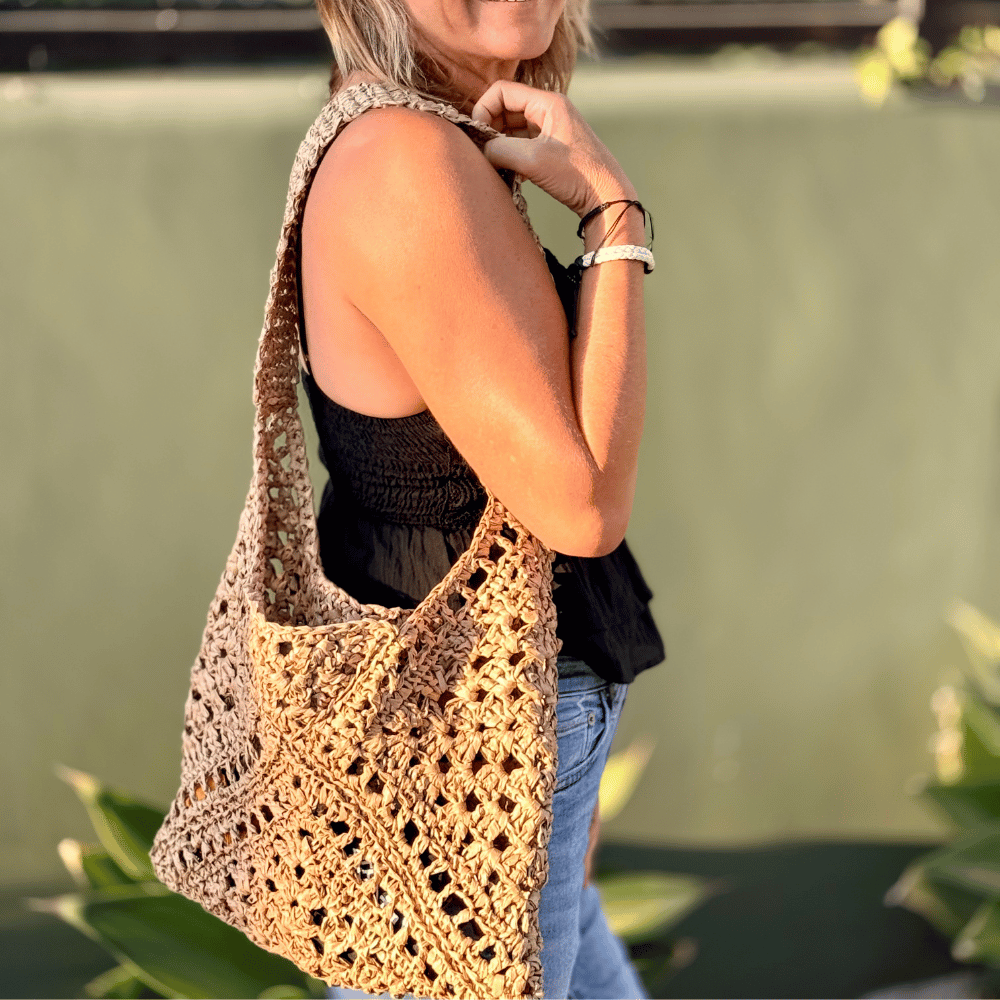
The combination of raffia paper and granny squares felt perfect for the Seabreeze Tote. It still has that familiar granny square construction, but the raffia gives it a completely different finish.
It’s casual enough to throw over your shoulder for the beach, yet it also looks great for farmers markets, shopping, vacations, or everyday summer adventures.

Crocheting With Raffia Paper
If you’ve never crocheted with raffia paper before, it definitely feels different from working with regular yarn.
Raffia paper has very little stretch, so you may need a little time to get used to the tension. However, once you find your rhythm, it’s really fun to work with. It also creates a lightweight yet structured fabric that works beautifully for crochet bags.
One trick that helped me was using a mist spray bottle while crocheting.
I lightly misted the raffia to soften it and make it a little easier to work with. You only need a small amount of water. You don’t want to soak the raffia, since too much moisture can weaken the paper and cause it to tear.
A light mist was enough to make it more flexible and easier on my hands.

Trying Colored Raffia Paper
Of course, I had to experiment a little!
For one of my Seabreeze Totes, I substituted the original raffia with colored raffia paper just for fun. It was listed as the same width, but I found that the colored raffia wasn’t quite as thick.
Because it was thinner, it was actually easier to crochet with.
However, even though the colored version was easier on my hands, I personally prefer the finished look of the original raffia. The thicker texture gives the raffia crochet bag a little more structure and creates that natural woven look I was going for.
Both worked, though, and the finished bags came out approximately the same size.
So if you find a colored raffia that you absolutely love, have fun with it! Just keep in mind that raffia can vary in thickness, even when the width listed on the package is the same.

An Easy Granny Square Raffia Crochet Bag
The construction of the Seabreeze Tote is surprisingly simple.
You’ll make:
- 3 granny squares
- 2 granny square triangles
- A strap in your preferred length
That’s it!
The squares and triangles are joined together to create the shape of the bag. I love this type of construction because you can watch the bag take shape piece by piece without having to tackle anything overly complicated.
If you’re comfortable making granny squares, this is a fun project to try with a new material.
It’s also a great weekend crochet project. Make your squares, join everything together, add your strap, and your new summer bag is ready to go.

Shoulder Bag or Crossbody? You Choose!
One of my favorite things about this raffia crochet bag is that you can customize how you want to wear it.
Keep the strap shorter for an easy shoulder bag that you can grab on your way out the door. Or make the strap longer and turn your Seabreeze into a crochet crossbody bag.
I love the crossbody option for markets, vacations, and days when I want my hands free. On the other hand, the shoulder version gives it more of that classic summer tote feel.
Choose whichever works best for you—or you may just need to make both!
A Perfect Weekend Crochet Project
The Seabreeze Tote is one of those projects that feels different without being difficult.
The granny square construction keeps everything familiar, while the raffia gives you a chance to experiment with a new fiber. Since you only need three squares and two triangles for the main bag, it’s also a manageable project to work on over a weekend.
And because the finished bag is so useful, it makes a great handmade gift.
Make one for a birthday, a friend heading on vacation, or someone who loves beach days and farmers markets. You can keep the natural raffia look or have fun choosing a colored raffia that fits their style.
Of course, you can always make one for yourself first!
🎥 Step-by-Step Video Tutorial
f you’re more of a visual learner, check out my step-by-step video tutorial and follow along as you make your Seabreeze Tote.
I’ll walk you through the process so you can see exactly how the pieces come together.
Start Crocheting Today
Download the ad-free PDF crochet bag pattern and start crocheting your very own stylish crochet bag today!
ETSY
RAVELRY
Supplies Needed
The Yarn
Yarn Used:
Raffia Paper Ribbon
Colored Raffia Substitute:
Colored Raffia Paper Ribbon
When substituting raffia, pay attention to more than just the listed width. As I found with my colored version, two raffias can have the same width but a different thickness.
That difference can affect how the material feels while crocheting and the texture of the finished bag.
Crochet Hooks
Notions
Optional
Gauge
Large Granny Square = 10” square / Triangle = 5″ wide (base) and 4″ tall (sides).
Strap 7 st X 7 rows = 2.5″ X 2.5″
Notes
- Raffia can be a bit hard and stiff to work with. I like to lightly mist it with water to help soften it and make it easier to crochet. Be careful not to over-wet the raffia, as too much moisture can weaken the fibers and cause them to tear.
- All rounds are always worked on the RS.
- The granny square follows the basic granny square pattern but there is no ch 1 between each cluster, only the corners will have a ch 1, this makes the square tighter.
- The space between each cluster is referred as “sp”.
- A sc is worked instead of a sl st to join the round and is referred as “sc-sp”. This creates a space to work into for the next round.
- The two triangles are two small granny quarters.
- While seaming, the back loop of the top piece will be facing you.

Pattern
GRANNY SQUARE – MAKE 3
Beg ch-3 counts as 1 dc throughout.st
A sc is worked instead of a sl st to join the rounds, and is referred as “sc-sp”.
Round 1: (RS) Starting with a magic ring (or ch 4, sl st to first ch to form a ring), (ch 3, 2 dc, ch 1) in ring, (3 dc, ch 1) 3 times in ring, tighten ring and sc in 3 rd ch of beg-ch to join round. (12 dc, 4 ch1-sps)
Each corner consists of (3 dc, ch 1, 3 dc).
Round 2: (RS) (Ch 3, 2 dc) in sp created by the sc of the previous round (sc-sp), [(3 dc, ch 1, 3 dc) in next ch1-sp] 3 times, (3 dc, ch 1) in same sc-sp as beg-ch, sc in 3rd ch of beg-ch to join round. (4 corners made)
There is now a space between each corner, and is referred as “sp”.
A 3 dc cluster will be worked in that sp.

Round 3: (RS) (Ch 3, 2 dc) in sc-sp, [3 dc in the sp between the corners, (3 dc, ch 1, 3 dc) in next corner ch1-sp] 3 times, 3 dc in next sp, (3 dc, ch 1) in same sc-sp as beg-ch, sc in 3rd ch of beg-ch to join round. (4 cl and 4 corners)
In Round 4, there are now 2 sps between each corner.
In Round 5, there will be 3 sps between each corner.
Continue working a 3 dc cluster in each sp between the corners.

Round 4: (RS) (Ch 3, 2 dc) in sc-sp, [3 dc in each of the next 2 sps, (3 dc, ch 1, 3 dc) in next corner ch1-sp] 3 times, 3 dc in each of the last 2 sps, (3 dc, ch 1) in same sc-sp as beg-ch, sc in 3rd ch of beg-ch to join round. (8 cl and 4 corners)
Round 5: (RS) (Ch 3, 2 dc) in sc-sp, [3 dc in each of the next 3 sps, (3 dc, ch 1, 3 dc) in next corner ch1-sp] 3 times, 3 dc in each of the last 3 sps, (3 dc, ch 1) in same sc-sp as beg-ch, sc in 3rd ch of beg-ch to join round. (12 cl and 4 corners)
The next round will be a round of sc.
Beg ch-1 does not count as a st throughout.
Round 6: (RS) (Ch 1, 2 sc) in sc-sp, [sc in each of the next 15 dc, (2 sc, ch 1, 2 sc) in next corner ch1-sp] 3 times, sc in each of the last 15 dc, (2 sc, ch 1) in same sc-sp as beg-ch, sc in 1st sc to join round. (60 sc and 4 corners)
The next round will be a round of (ch 1, sk 1, dc).
Round 7: (RS) (Ch 3, dc) in sc-sp, [(ch 1, sk 1 sc, dc in next sc) rep across to corner, ch 1 before working corner, (2 dc, ch 1, 2 dc) in next corner ch1-sp] 3 times, (ch 1, sk 1 sc, dc in next sc) across to last corner, ch 1 before working last corner, (2 dc, ch 1) in same sc-sp as beg-ch, sc in 3rd ch of beg-ch to join round.
[(9 dc, 10 ch1-sps) per side and 4 corners]
The final round will be a round of sc.
Round 8: (RS) (Ch 1, 2 sc) in sc-sp, [sc in next dc, 2 sc in each ch1-sp across to corner, sc in last dc before corner, (2 sc, ch 1, 2 sc) in next corner ch1-sp] 3 times, sc in next dc, 2 sc in each of the last ch1-sps, sc in last dc before corner, (2 sc, ch 1) in same sc-sp as beg-ch, sl st to 1st sc to join round. (22 sc per side and 4 corners)
Fasten off.
PM to mark the RS and weave in ends.

TRIANGLES – MAKE 2
Beg ch-3 counts as first dc.
Row 1: Starting with a magic ring (or ch 4, sl st to first ch to form a ring), (ch 3, 3 dc, ch 1, 4 dc) in ring, turn. (Corner made)
Tighten ring to create the triangle (do not fasten ring too tight).
Row 2: Ch 3, 3 dc in between the 1st 2 dc, (3 dc, ch 1, 3 dc) in corner ch1-sp, 3 dc in between the last dc and beg ch-3, dc in top of beg ch-3, turn. (2 dc, 2 cl, 1 corner)


Row 3: Ch 3, 3 dc in between the 1st 2 dc, 3 dc in the sp between the cl and corner, (3 dc, ch 1, 3 dc) in corner ch1-sp, 3 dc in the next sp between the corner and cl, 3 dc in between the last dc and beg ch-3, dc in top of beg ch-3, turn. (2 dc, 4 cl, 1 corner)
A row of sc will be done across the base of the triangle to tidy up that side.
Tighten the magic ring if needed.
Row 4: (RS) Ch 1 and sc 11 sts evenly across the base of the traingle. (11 sts)
Fasten off.
PM to mark the RS and weave in ends.
SEAMING SQUARES AND TRIANGLES
To form the shape of the bag, start by folding the squares with RS facing out.

Next, use the seaming technique described below to seam the squares and triangles together.
- Always ensure that the RS are facing each other while seaming.
SEAMING TECHNIQUE
With the RS facing each other, stack two squares on top of one another.
- Note: While the back loop of the bottom square remains unchanged, the back loop of the top square will be positioned in front of the square.
Seam the squares together using a whip st, carefully aligning the sts as you go;
With yarn and needle, insert the needle from back to front through the back loops of both pieces and pull the yarn through. Rep this process in each st across.
Use the same method to seam the triangles.
STEAM YOUR WORK – OPTIONAL
Once you have completed seaming your bag, use a garment steamer (or a steam iron held an inch or two away) to gently soften the paper. You can then flatten and shape your piece with your hands for a professional, crisp finish.
STRAP
Lay the bag flat and choose a corner for the strap, locate the ch1-sp of the square, and from there, count 3 sts to the right to attach the yarn, then ch 1.


Row 1: Sc in same st as the yarn, sc in next 2 sts, sc in ch1-sp, sc in next 3 sts, turn. (7 sts)
Row 2: Sc in each of the 7 sts. (No turning ch)
Row 3: Rep row 2 until desired length.
- Do not fasten off.
Strap width: 2.5″.
Strap length: Shoulder 23″ long/Crossbody 38″ long.

SEAMING STRAP
- With RS facing each other, pm through both the ch-1 sp of the square (bag) and the middle st of the strap, making sure the strap is not twisted. There should be 3 sts on each side of the marker. (7 sts)
- (WS) Pick up the yarn and sl st across the 7 sts, working through both loops of the bag and strap and matching the sts across.
- Fasten off and weave in ends.


Take Your Seabreeze Tote Everywhere
The finished raffia crochet bag has that relaxed summer feel that makes it easy to grab for so many different outings.
Bring it along for a beach day, carry it through your local farmers market, take it shopping, or pack it for your next vacation. The natural raffia texture works especially well for warmer weather and gives the bag that effortless beachy look.
And because you can choose between a shoulder or crossbody strap, you can make your Seabreeze fit the way you actually like to carry your bags.
Need More Inspiration?
If you like working with granny squares, try the Tigerlily Tote. It’s a fun way to combine bold colors and use leftover yarn from your stash to create a unique, eye-catching bag.
If you love the look of wooden handles, the Chloe Crochet Bag or Brooklyn Crochet Bag may be perfect for you. Both are made with super-bulky yarn, creating stylish, sturdy bags that work up quickly.
For an ocean-inspired design, check out the Amelia Bag, featuring the beautiful Long Wave Stitch for a flowing, textured finish.

Pattern Quality
All Mermaids & Hooks patterns are tech edited and tested, not AI generated.
Affiliate Disclosure:
This post may contain affiliate links. If you purchase through these links, I may earn a small commission at no extra cost to you. Thank you for supporting Mermaids & Hooks and helping me continue to create free crochet patterns and tutorials.