
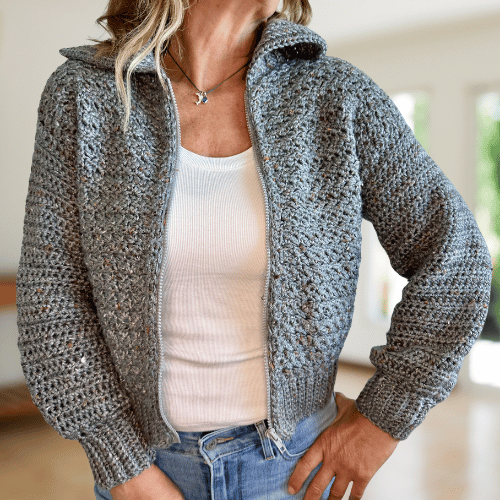
Meet the Wrenley Vest and Cardigan — your wardrobe’s new must-have! Whether you go for the cozy cardigan, the chic vest, or treat yourself to both, this versatile design blends comfort with timeless style. The woven stitch creates a beautiful texture, while the sleek zipper adds a fun, modern twist. In addition, you can easily adjust the length to make it even longer if you’d like!

Above all, I absolutely loved working with the Tilted Pair stitch — the texture it creates is just gorgeous! Paired with Caron Simply Soft Tweed , it adds an extra layer of style and cozy warmth that really makes the project stand out. Additionally the yarn is incredibly soft, and the stitch pattern works up quickly, making it such a joy to crochet. For more inspiration, check out the Wrenley Oversized Cardi, which also uses the Tilted Pair crochet stitch.
The pattern includes a step-by-step video tutorial and written instructions for sizes XS–5X. You can easily adjust the length to make it longer and extra warm, alternatively, you can turn it into a stylish vest that’s perfect for warmer months.
Supplies Needed
The Yarn
For this crochet cardigan, I used a #4 medium-weight yarn, and I absolutely loved working with Caron Simply Soft Tweed! It’s incredibly soft, comfortable, and easy to crochet with.
The tweed yarn has subtle flecks of brown scattered throughout, adding beautiful texture and extra interest to the finished cardigan. I especially love how the tweed complements the knit-look crochet stitch.
If you’d like to add some color, Caron Blossom Cake is a great option. The beautiful color changes can add even more personality to your crochet cardigan.
If you’re looking for a yarn that won’t break the bank, Hobby Lobby Crafter Secrets Big Idea and Lion Brand Vanna’s Choice are both great alternatives. I used Vanna’s Choice for my Emilie Cardigan, and it worked up beautifully.
Another great option is Lion Brand Heartland, which I used for my Wrenley Oversized Cardi. It’s soft, easy to work with, and a great choice for a cozy crochet cardigan.
Need help choosing a substitute? Check out my guide on How to Choose the Right Yarn for Crochet Garments.

#4 Medium Weight, 240 yds / 219 m, 5 oz / 141 g, 97% Acrylic, 3% Viscose
Shown in Off White Tweed and Grey Heather Tweed.
Crochet Hooks
Notions
Gauge
Band & Cuffs: 2″ X 2″ = 8.5 sts X 5.5 rows of sc blo
Body: 4″ X 4″ = 11 sts X 10 rows with the main st pattern
Sleeves: 4″ X 4″ = 13 sts X 9 rows of hdc.
Collar: 4″ X 4″ = 14 sts X 11 rows of hdc blo.
Gauge Pattern:
Row 1: Ch any odd #, sc in 2nd ch, *[(sc, dc), sk] rep from*, sc in last st, turn.
Row 2: Ch 1, sc in 1st, *[(sc, dc), sk] rep from*, sc in last, turn.
Rep row 2 until desired length.

Check out the Video Tutorial
Purchase the ad free PDF
Finally, you may purchase the Wrenley Vest and Cardigan pattern, which includes the ad-free PDF with full written instructions, schematics, a size chart, and gauge information.
ETSY
RAVELRY
Construction
The body is worked flat in three pieces — one back panel and two front panels. Once that’s done, the sleeves join the party! They’re crocheted right onto the body in joined, turned rounds — easy, seamless, and so satisfying to watch come to life — as well as the ribbing, which is added directly as you go for a beautifully clean finish.
Abbreviations
- ch(s): chain(s)
- dc: double crochet
- hdc: half double crochet
- hdc blo: half double crochet in the back loop only
- pm: place marker
- rep: repeat
- RS: right side
- sc: single crochet
- sc blo: single crochet in the back loop only
- sc2tog: single crochet 2 together
- sk: skip
- st(s): stitch(es)
- WS: wrong side
- YO: yarn over
Special Stitches
SINGLE CROCHET 2 TOGETHER – sc2tog: Insert hook in st, YO, pull up a loop, insert hook in next st, YO, pull up another loop, YO and pull up all 3 loops on hook.
Notes
- The stitch count will be displayed as follows: XS (S, M, L, XL) (2X, 3X, 4X, 5X) sts. If there is only one number, it applies to all sizes.
- Row 3 to 20 (22, 22, 28, 28) (34, 34, 38, 38): means rep from row 3 to 20 for size XS, 3 to 22 for size S etc.
- The body is worked flat in 3 pieces: the body and 2 front panels.
- The sleeves are crocheted directly onto the body, worked in joined and turned rounds.
- The body uses [(sc, dc), sk]: (sc, dc), which means work 1 sc and 1 dc in the same st then sk the next st.
- The garment is meant to be cropped, size up for a bigger sweater.

Pattern
BACK PANEL
BAND
Row 1: With the smaller hook, starting with a slip knot, ch 11, sc in 2nd ch from the hook, sc in each of the remaining chs, turn. (10) sts
Row 2 : Ch 1, sc blo in 1st st, work 1 sc blo in each st across, turn.
Rows 3 to 52 (56, 60, 68, 72) (80, 84, 88, 92): Rep row 2.
- Do not fasten off and turn band lengthwise.
- With the larger hook, ch 1 and sc 52 (56, 60, 68, 72) (80, 84, 88, 92) sts evenly along the length of the band (1 st per row). 52 (56, 60, 68, 72) (80, 84, 88, 92) sts
BODY
Row 1: (WS) With the larger hook, ch 1, sc in the 1st st – pm in the 1st st here and the 1st st of the next row – move markers up at every row – *(sc, dc) in the next st, sk next st, rep from * to last st, sc in last st, turn. 52 (56, 60, 68, 72) (80, 84, 88, 92) sts
Rows 2 to 38 (38, 38, 46, 46) (46, 54, 54, 54): Rep row 1.
- To adjust the length of the body add or subtract rows here, bearing in mind that 1″ = 2.5 rows, finishing on RS row and making sure to adjust all other panels.
- Fasten off.

FRONT PANELS – MAKE 2
BAND
Row 1: With the smaller hook, starting with a slip knot, ch 11, sc in 2nd ch from the hook, sc in each of the remaining chs, turn. (10) sts.
Row 2 : Ch 1, sc blo in 1st st, work 1 sc blo in each st across, turn.
Rows 3 to 26 (28, 30, 34, 36) (40, 42, 44, 46): Rep row 2.
- Do not fasten off and turn band lengthwise.
- With the larger hook: ch 1, sc 26 (28, 30, 34, 36) (40, 42, 44, 46) evenly along the length of the band (1 st per row). 26 (28, 30, 34, 36) (40, 42, 44, 46)
BODY
Row 1: (WS) With the larger hook, ch 1, sc in the 1st st, *(sc, dc) in the next st, sk next st rep from * to last st, sc in last st, turn. 26 (28, 30, 34, 36) (40, 42, 44, 46)
Row 2 to 38 (38, 38, 46, 46) (46, 54, 54, 54): Rep row 1.
- Fasten off and repeat for 2nd panel.
SEAMING
SHOULDERS
- Lay the back panel flat with WS up and place the front panels on top with their RS facing up (the WS will be facing each other).
- At the shoulder, starting from the armhole and moving towards the neck opening, pm on the 15 (17, 19, 23, 24) (28, 30, 32, 34)th st through both front and back panels. Repeat on other side. The neck opening should measure 8 (8, 8, 8, 8) (9, 9, 9, 9)”.
- Unfold the panels and place the front and back pieces side by side at the shoulders with the RS facing up, using a mattress stitch seam the shoulders from the armhole to the st marker, ensuring each stitch on both panels aligns.

SIDES
- Fold the garment RS out. From the bottom (not counting the band), pm on the 19 (18, 17, 23, 22) (21, 28, 26, 25)th row of the body through both the front and back panels to mark the armholes. The armholes should measure 7.5 (8, 8.5, 9, 9.5) (10, 10.5, 11, 11.5)”.
- With the RS facing out, position the front and back panels side by side, and seam the sides using a mattress stitch from the band up to the marker, ensuring that the rows of both panels are aligned.
SLEEVES X2
- The sleeves are crocheted directly onto the body.
- They will be worked in joined and turned rounds: sl st to the 1st st and turn at the end of each round to create a straighter seam and maintain the appearance of the panels.
- With RS facing out, attach yarn at the armpit.
Round 1: (RS) With the larger hook, ch 1, hdc in the same st as the yarn, and hdc 39 (41, 45, 47, 51) (59, 65, 67, 67) evenly around the armhole, sl st to 1st st, turn. 40 (42, 46, 48, 52) (60, 66, 68, 68)
Round 2: (WS) Ch 1, hdc in the 1st st and remaining sts around the armhole, sl st to 1st st, turn.
VEST
Round 3 to 4: Rep row 2.
- Fasten off.
- Repeat on other side then move to the collar section.

CARDIGAN
Rounds 3 to 32 (34, 34, 36, 36) (38, 38, 40, 40) : Rep row 2.
- Adjust sleeve’s length here by adding or subtracting rounds finishing on a WS, bearing in mind that 1″ = 2.25 rows and making sure to adjust the second sleeve.
- Do not fasten off as the cuff will be worked directly from the sleeve.
CUFFS
FOUNDATION ROUND
- (RS) With the smaller hook, a round of sc is done around the sleeve as follows;
- Ch 1 does not count as a st and the beginning st is placed in the 1st st;
- sc 2 means 1 sc in each of the next 2 sts;
XS: Ch 1, *(sc2tog) twice, sc, rep from *, sl st to 1st sc. (24)
S: Ch 1, *(sc2tog) twice, sc, rep from * to last 2 sts, sc 2, sl st to 1st sc. (26)
M: Ch 1, *(sc2tog) twice, sc, rep from * to last st, sc in last st, sl st to 1st sc. (28)
L: Ch 1, *(sc2tog) twice, sc, rep from * to last 3 sts, sc2tog, sc, sl st to 1st sc. (29)
XL: Ch 1, *(sc2tog) twice, sc, rep from * to last 2 sts, sc2tog, sl st to 1st sc.(31)
2XL (3XL, 4XL, 5XL): Ch 1, sc2tog around to last 2 sts, sc 2, sl st to 1st sc. 31 (34, 35, 35)
- Do not fasten off.
- The cuff is now worked directly from the sleeve.

CUFF
Row 1: Ch 11, sc in 2nd ch from the hook, sc in each of the remaining chs, at the sleeve’s edge, sk the 1st sc and work 1 sl st in each of the next 2 sc of the sleeve’s edge, turn. (10)
Row 2: Sk the 2 sl sts of the sleeve’s edge, sc blo in 1st st, work 1 sc blo in each st across, turn.
Row 3: Ch 1, sc blo in the 1st st, work 1 sc blo in each st across, sl st in each of the next 2 sc of the sleeve’s edge, turn.
- Repeat rows 2 and 3 all the way around the sleeve.
- Fasten off with a long tail for seaming.
- Turn sleeve and cuff inside out, with yarn and needle seam the cuff with a whip st.
- Repeat for 2nd sleeve.

COLLAR
- The collar is worked directly onto the sweater.
- (RS) Attach yarn at the bottom of the right front panel and with the smaller hook work a row of sc evenly across the length of the right front panel, around the collar and back down the other front panel (1 sc per st for the band and collar, 1 sc per row for the body). Fasten off.
- Attach yarn at the top corner of the right front panel.
Row 1: (RS) With the smaller hook, ch 21, hdc in 2nd ch from the hook, hdc in each of the remaining chs, at the neckline, sk the 1st sc and work 1 sl st in each of the next 2 sc of the neckline, turn. (20)
Row 2: Sk the 2 sl sts of the neckline, hdc blo in 1st st, work 1 hdc blo in each st across, turn.
Row 3: Ch 1, hdc blo in the 1st st, work 1 hdc blo in each st across, sl st in each of the next 2 sc of the neckline, turn.
- Repeat rows 2 and 3 all the way around the collar.
- Fasten off and weave in ends.
BLOCKING
- Block the garment to measurement – do not block cuffs, band and collar.

ZIPPER
- For the zipper size, measure the edging from the band to the collar, to ensure a perfect fit.
- Attach the zipper using thread that matches the yarn color.
- Don’t forget to check out my video tutorial for additional guidance.
Thank you for visiting Mermaids and Hooks! I hope this pattern brought you joy and sparked the desire to grab your hook and make something beautiful.

If you need more inspiration check out:
If you like zippers, check out my Zipper Bomber Sweater or the Button Bomber Sweater if you prefer buttons.
You can also check out my oversized cardis like my Patchwork Cardi if you want a splash of color or my knit like cardi the Emilie Oversized Cardigan!
Affiliate Disclosure:
This post may contain affiliate links. If you purchase through these links, I may earn a small commission at no extra cost to you. Thank you for supporting Mermaids & Hooks and helping me continue to create free crochet patterns and tutorials.