
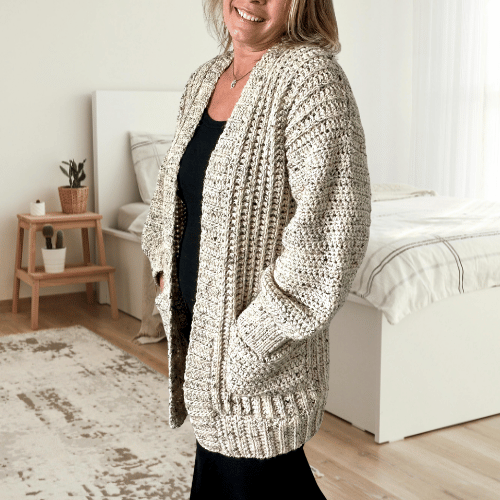
The Emilie Oversized Cardigan: Easy Knit-Look Crochet Pattern for Beginners – Free Pattern
There’s nothing better than wrapping yourself in a cozy oversized crochet cardigan that you made yourself, because of that the Emilie Oversized Cardigan was designed to be simple, fun, and easy to wear — with a beautiful knit-look crochet texture and the option to play with color to match your style.
If you’ve been searching for an easy crochet cardigan pattern for beginners or a crochet sweater that looks like knitting, this one is for you.
✨ The Inspiration Behind the Emilie Cardigan
Without a doubt, I love creating beginner-friendly crochet patterns, and the Emilie Oversized Cardigan was designed with that in mind — simple, relaxing, and fun to make from start to finish. Just like pieces in my Wrenley Collection, including the Wrenley Oversized Cardigan and the Wrenley Hoodie, this design focuses on easy construction while still creating something you’ll be proud to wear.
The knit-look crochet stitch gives it that cozy, ribbed texture without adding complexity, so you can enjoy the process and make a cardigan you’ll reach for again and again.
I also wanted this design to give you creative freedom when it comes to color. For example, you can go bold with two-color combinations (or even more) for a fun, eye-catching look or, if you prefer, you can keep it simple and classic with one solid color.
Above all, this makes it a versatile color block crochet cardigan pattern or a classic solid crochet cardigan, depending on your mood.

The Knit-Look Crochet Stitch You’ll Love
This design features a knit-look crochet stitch that creates a soft, ribbed texture. As a result, you get that knit-style look while still using crochet.
If you’ve searched for:
- knit look crochet cardigan pattern
- crochet that looks like knitting
- textured crochet cardigan pattern

Supplies Needed
Yarn
For this project, I used #4 worsted weight yarn.
I chose Lion Brand Vanna’s Choice for the one-color cardigan, a heathered yarn with subtle flecks of brown and black.
You can get all the yarn you need to make your crochet cardigan, along with the printable PDF pattern, in one convenient bundle from Lion Brand HERE.
And for the color-block version, I used Knit Picks City Tweed. I especially love the soft merino feel and beautiful tweed texture. However, it is a more expensive option. So, if you’re looking for a yarn that won’t break the bank, Vanna’s Choice is a great alternative.
Need help choosing a substitute? Check out my guide on How to Choose the Right Yarn for Crochet Garments.
One Color Yarn


#4 Medium / Worsted Weight, (92% acrylic and 8% rayon). 145 yds / 133 m, 3 oz / 85 g shown in Oatmeal.
Color Block Yarn
KnitPicks City Tweed, #4 Aran / Heavy Worsted weight, (55% Merino Wool, 22% Superfine Alpaca, 20% Donegal Tweed), 164 yds / 150 m, 3.5 oz / 100 g shown in Orca (MC) and Lemon Curd (C2).
Crochet Hooks
Notions
Gauge
4″ X 4″ = 11 sts X 9 rows
Sizes: XS (S, M, L, XL) (2 XL, 3 XL, 4 XL, 5 XL)
To fit bust: 30 (34, 38, 42, 46) (50, 54, 58, 62)″
Finished bust: 38 (42, 46, 50, 54) (58, 62, 66, 70)″
Customizable for the Perfect Fit
📏 Adjustable Length for Your Style
This pattern is fully customizable so you can create the exact look you want.
Make it:
- A cropped crochet cardigan
- A classic everyday length cardigan
- A long oversized crochet cardigan
Just add or reduce rows to adjust the length — it’s that easy. The sleeves can also be adjusted the same way.
Want an even cozier look? You can also add the optional pockets for extra warmth and practicality.

Video Tutorial Included
Beginner-Friendly With a Professional Look
If you’re more of a visual learner, check out my step-by-step video tutorial, where I’ll guide you through the entire project.
Start Crocheting Today
Download the ad-free PDF pattern and start crocheting your own oversized cardigan today!
The pattern includes:
Full written instructions
Step-by-step video tutorial
Size inclusive: XS to 5XL
Customizable length options
Optional pockets
Beautiful textured stitch pattern
ETSY
RAVELRY
You can get all the yarn you need to make your crochet cardigan, along with the printable PDF pattern, in one convenient bundle from Lion Brand HERE.
Designed to Be Easy to Make
Unquestionably, one of my favorite things about this pattern is how simple and beginner-friendly the construction is.
Firstly, the body is worked flat in one piece from side to side, and once you reach your desired length, the shoulders are sewn together.
Subsequently, the sleeves are crocheted directly onto the body in joined rounds, keeping everything easy and reducing extra seaming.
Finally, the edging is made to measure and then attached, giving your cardigan a clean and cozy finish.
Abbreviations
ch(s): chain(s)
C2: color 2
hdc: half double crochet
hdc-3lo: half double crochet in the 3rd loop on the stitch
hdc BLO: half double crochet in the back loop only
MC: main color
pm: place marker
RS: right side
sc: single crochet
sc2tog: single crochet 2 together
sl st BLO: slip stitch in the back loop only
sk: skip
sl st: slip stitch
st(s): stitch(es)
WS: wrong side
YO: yarn over

Special Stitches
HALF DOUBLE CROCHET IN THE 3RD LOOP – hdc-3lo: YO, insert hook in the horizontal bar at the front of the st (3rd loop of the stitch), YO, draw up a loop, YO, pull through all 3 loops on hook.
Notes
The beginning ch does not count as a st unless specified.
The stitch count will be displayed as follows: XS (S, M, L, XL) (2X, 3X, 4X, 5X). If there is only one number, it
applies to all sizes.
Rows 3 to 20 (22, 22, 28, 28) (34, 34, 38, 38): means rep from row 3 to 20 for size XS, 3 – 22 for size S etc.
Place a marker on the 1st st so you don’t lose it.
To adjust the length of the sweater add or subtract chains, bearing in mind that 3 sts = 1.10″
To adjust the length of the sleeves add or subtract rows, bearing in mind that 1 row = 1/2″
If doing just one color, just ignore the color change throughout the pattern.
Pattern
LEFT FRONT PANEL
Row 1: (RS) With the larger hook and MC, starting with a slip knot, ch 73 (75, 75, 75, 77) (77, 79, 79, 79), in the back bump of the chain, hdc in 2nd ch from the hook and across remaining chs, turn. 72 (74, 74, 74, 76) (76, 78, 78, 78) sts
Adjust length here by adding or subtracting chs.
Row 2: Ch 1, hdc in the first st – pm in the 1st st here and throughout – hdc-3lo in the next st and across to the last st, hdc in last st, turn.
Rows 3 to 16 (18, 20, 22, 24) (26, 28, 30, 32): Rep row 2. Do not fasten off.
If you want the garment to be wider, you can add rows here, but ensure you add the same number of rows to the back and right panels.

BACK PANEL
Starting from the opposite side of the hook, pm on 18 (20, 21, 22, 24) (25, 26, 27, 29)th st to mark armhole.
Row 1: Ch 1, hdc in the 1st st, hdc-3lo in the next st and across to the st before marker, ch 19 (21, 22, 23, 25) (26, 27, 28, 30), turn. 54 (54, 53, 52, 52) (51, 52, 51, 49) hdc + 19 (21, 22, 23, 25) (26, 27, 28, 30) chs

Row 2: Hdc in the 2nd ch from the hook and remaining chs, hdc-3lo across the front panel of the sweater to the last st, hdc in last st, turn. 72 (74, 74, 74, 76) (76, 78, 78, 78) sts
This will create the gap for the armhole; continue crocheting the back just as you did for the front.
Row 3: Ch 1, hdc in 1st st, hdc-3lo in next st and across to last st, hdc in last st, turn.
Rows 4 to 42 (46, 50, 56, 60) (66, 70, 74, 78): Rep row 3.
RIGHT FRONT PANEL
From the opposite side of the hook, pm on 18 (20, 21, 22, 24) (25, 26, 27, 29)th st to mark the 2nd armhole.
Row 1: Ch 1, hdc in the 1st st, hdc-3lo in the next st and across to the st before marker, ch 19 (21, 22, 23, 25) (26, 27, 28, 30), turn. 54 (54, 53, 52, 52) (51, 52, 51, 49) hdc + 19 (21, 22, 23, 25) (26, 27, 28, 30) chs
Row 2: Hdc in the 2nd ch from the hook and remaining chs, hdc-3lo across the back panel of the sweater to the last st, hdc in last st, turn. 72 (74, 74, 74, 76) (76, 78, 78, 78) sts

2nd armhole made; continue crocheting the front just as you did for the other 2.
Row 3: Ch 1, hdc in 1st st, hdc-3lo in next st and across to last st, hdc in last st, turn.
Rows 4 to 16 (18, 20, 22, 24) (26, 28, 30, 32): Rep row 3.
Fasten off. Fold so that the WS is facing out, and seam the shoulders together using a whip stitch.
SLEEVES AND CUFFS
The sleeves are directly crocheted onto the body and worked back and forth in rows to prevent a slanted seam.
SLEEVE ONE
Attach C2 at the armpits.

Row 1: (RS) With the larger hook, ch 1 and hdc in same st as the yarn, hdc around the armhole, sl st in the 1st st, turn. 40 (43, 45, 47, 50) (52, 55, 58, 60) sts
This roughly adds up to 1 st per hdc of the armhole, but squeeze in the added sts at shoulder and/or underarm.
Row 2: (WS) ch 1, hdc around the armhole and sl st to 1st st, turn.
Rows 3 to 28 (28, 28, 28, 32) (32, 32, 32, 32): rep row 1 and 2.
Adjust sleeve length here by adding or subtracting rows.
Row 29 (29, 29, 29, 33) (33, 33, 33, 33): (RS) Rep row 1 one more time. Fasten off but do not turn at the end of the row.
Row 30 (30, 30, 30, 34) (34, 34, 34, 34): (RS) With smaller hook and MC, ch 1, hdc in 1st st and around one more time, sl st to 1st st, turn. Do not fasten off.
CUFF ONE
As we crochet the cuff, it will be joined to the edge of the sleeve. Still using the smaller hook and MC, sc the width of the sleeve as follows;
Ch 1 does not count as a st and the beginning st is placed in the 1st st, [sc, sc2tog] 14 times means repeat what’s in [ ] 14 times;
Row 1: XS : Ch 1, [sc, sc2tog] 13 times, sc in last st. (27) sts
S: Ch 1, [sc, sc2tog] 14 times, sc in last st. (29) sts
M: Ch 1, [sc, sc2tog] 14 times, sc in last 3 sts. (31) sts
L: Ch 1, [sc, sc2tog] 15 times, sc in last 2 sts.(32) sts
XL: Ch 1, sc2tog, [sc, sc2tog] 16 times. (33) sts
2XL: Ch 1, sc2tog, [sc, sc2tog] 16 times, sc2tog one more time. (34) sts
3XL: Ch 1, sc2tog, [sc, sc2tog] 17 times, sc2tog one more time. (36) sts
4XL: Ch 1, sc2tog, [sc, sc2tog] 18 times, sc2tog one more time. (38) sts
5XL: Ch 1, sc2tog, [sc, sc2tog] 18 times, sc2tog 2 more times. (39) sts
Sl st to 1st st and fasten off.

Row 2: With smaller hook and C2, ch 13, sl st in 2nd ch from hook and across, sl st in the 1st sc of the sleeve’s edge, turn. (12) sts
Row 3: Sk the sl st from the sleeve’s edge, sl st BLO across, turn.
Row 4: Ch 1, sl st BLO in 1st st and across, sl st in next sc of the sleeve’s edge, turn.
Repeat row 3 and 4 around the sleeve’s edge and fasten off with a tail forseaming. With the sleeve inside out and the WS facing out, seam the cuff with a whip st.
Repeat same instructions for the second sleeve.
BLOCKING
Block the garment to measurements, do not block the cuffs.

WAISTBAND AND EDGING
The band and edging are worked in rows and attached to the body with yarn and needle.

WAISTBAND
Row 1: With the larger hook and C2, starting with a slip knot, ch 13, in the back bump, hdc in the 2nd ch and across remaining chs, turn. (12) sts
Row 2: Ch 1, hdc BLO in 1st st and across, turn.
Repeat row 2 until band equals the width of the back and front panels. Fasten, but leave the yarn uncut in case adjustments to the length are needed, start seaming from other end.

SEAMING
Place the waistband and the body next to each other with the right sides facing upward, with yarn and needle use the mattress stitch to seam the waistband to the body.
EDGING
Row 1: With the larger hook and C2, starting with a slip knot, ch 8, in the back bump, hdc in the 2nd ch and across, turn. (7) sts
Row 2: Ch 1, hdc BLO in 1st st and across, turn.
Repeat row 2 until the edging measures the length of the entire neckline.
Fasten, but leave the yarn uncut in case adjustments to the length are needed, start seaming from other end.
Follow same instructions for seaming as for the body and waistband.
POCKETS – OPTIONAL – MAKE 2
Row 1: (RS) With the larger hook and C2, ch 16, working in the back bump, hdc in 2nd ch from hook and across remaining chs, turn. (15) sts
Row 2: Ch 1, hdc in 1st st and across, turn.
Rows 3 to 12: Rep row 2. Fasten off and change to MC.
Row 13: Sc around the square to make a border as follows; [ch 1, sc 15] on each side of the square, sl st to 1st ch. Fasten off with a tail for seaming. (60) sts
Try on the garment to determine the appropriate placement for the pockets. Use a whip stitch to attach the pockets with MC and needle, ensuring the rows of the pocket are positioned horizontally.
If you need more inspiration check out:
Check out these oversized crochet cardigans: the Wrenley Oversized Crochet Cardigan or the Patchwork Crochet Cardigan.
Or the Bulky Crochet Hoodie and the matching Bulky Crochet Beanie
Affiliate Disclosure:
This post may contain affiliate links. If you purchase through these links, I may earn a small commission at no extra cost to you. Thank you for supporting Mermaids & Hooks and helping me continue to create free crochet patterns and tutorials.