
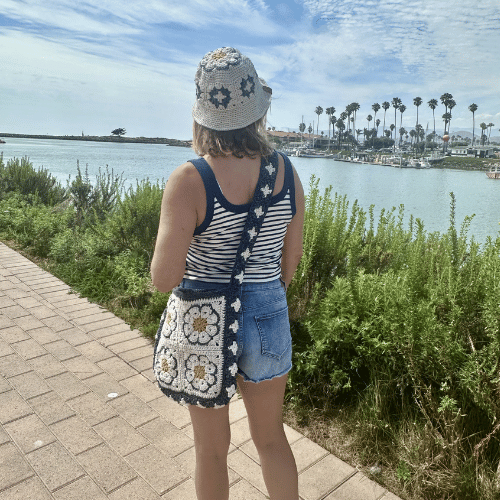
Tigerlily Tote: A Crochet Granny Square Bag Pattern You’ll Love Making
If you’re looking for a fun and colorful project, the Tigerlily Tote might be your next favorite make. This crochet granny square bag pattern combines the beauty of African Flower Granny Squares with a practical tote design that’s perfect for everyday use.
Whether you love playing with color or prefer a more classic look, this tote gives you plenty of creative freedom. The finished bag is roomy enough for your daily essentials while still being lightweight and comfortable to carry.

Why You’ll Love This Crochet Granny Square Bag Pattern
There’s something special about watching individual granny squares come together to create a finished bag. Each African Flower Granny Square adds beautiful texture and detail, making the Tigerlily Tote a project that’s as enjoyable to make as it is to use.
This crochet granny square bag pattern is perfect for crocheters who enjoy portable projects. Work on a square here and there, then assemble them into a stylish tote you’ll be proud to carry.

Create Your Own Unique Color Combination
One of the best things about the Tigerlily Tote is how versatile it can be. Use bright colors to create a bold statement piece, or choose a neutral palette for a timeless everyday bag.
Since the design is made up of individual squares, it’s easy to experiment with different color combinations.
Furthermore, it’s a great way to use up leftover yarn from previous projects. Mix and match colors from your stash to create a truly unique tote. No matter which colors you choose, the African Flower motif always creates a beautiful result.

Pockets
The bag also features inside pockets, which are great for keeping small items and your cell phone organized and within easy reach.

Learn the Invisible Join Technique
To give each square a clean finish, the pattern includes instructions for using the invisible join technique. This creates a seamless look without visible knots in the final round, helping your finished tote look neat and professional.
A Practical Tote for Everyday Use
The Tigerlily Tote isn’t just pretty—it’s practical too. The finished size makes it ideal for carrying your everyday essentials, whether you’re heading to the farmers market, meeting friends for coffee, or spending the day at the beach.
The sturdy construction helps the bag hold its shape while showcasing the beautiful granny square design.

Pattern Features
- African Flower Granny Square design
- Practical everyday tote size
- Endless color possibilities
- Includes inside pockets
- Step-by-step instructions
- Invisible join technique included
- Fun and relaxing project to make
Step-by-Step Video Tutorial
To make this crochet bag pattern even more beginner-friendly, I’ve included a full step-by-step video tutorial to guide you through the entire process.
So if you’re someone who loves visual learning, you’ll feel confident every step of the way.
Ready to Make Your Tigerlily Tote?
Download the ad-free PDF crochet bag pattern and start crocheting your very own stylish crochet bag today!
ETSY
RAVELRY
You can get all the yarn you need to make your bag, along with the printable PDF pattern, in one convenient bundle from Lion Brand HERE.
Supplies Needed
The Yarn
This crochet bag pattern was designed using Lion Brand Rewind, a #5 bulky tape yarn that creates a sturdy fabric with beautiful texture and structure—perfect for everyday use.
Lion Brand Rewind is a flat tape-style yarn made from a polyester blend. It is lightweight, durable, and works up quickly, making it an excellent choice for bags and accessories.
The unique tape construction gives your finished tote a modern look while helping it hold its shape.

You can get all the yarn you need to make your bag, along with the printable PDF pattern, in one convenient bundle from Lion Brand HERE.
Crochet Hooks
Notions
Gauge
Each large granny squares measure approximately 5.5″
Each small granny squares measure approximately 2″
Construction
The main body of the Tigerlily Tote is made from large African Flower Granny Squares. Once all 8 squares are complete, they are sewn together to create two 4-square panels that form the front and back of the bag.
The sides, bottom, and strap are made from 2″ granny squares. These smaller squares are sewn together to create a continuous band, which is then attached to the front and back panels to complete the bag.
This construction creates a sturdy tote with plenty of opportunities to play with color and make the design your own.

Notes
- All squares are worked in the round.
- Beg ch-2 and beg ch-3 count as a st.
- Beg ch-1 does not count as a st.
- To avoid feeling overwhelmed at the end of the project, weave in ends after completing each square.
- The smaller squares will create the sides and bottom of the bag, as well as the strap.
- You may follow my color scheme or design your own variation.
- The final fasten-off for each square is achieved by using the invisible sl st (see special sts), ensuring there are no knots in the last round.
Pattern
LARGE GRANNY SQUARES – MAKE 8
- Beg ch-2 counts as 1st hdc and beg ch-3 counts as a dc.
- Beg ch-1 does not count as a st.
- The rounds are always worked on the RS.
- With C1, start with a magic ring (or ch 4, sl st to first ch to form a ring);
Round 1 – Center: (RS) Ch 3 (counts as 1st dc here and throughout), 1 dc in ring, ch 1, [2 dc in ring, ch 1] 7 times. Tighten ring and join round with sl st to top of beg ch-3. (16 dc, 8 ch1-sps)
Fasten off and (RS) Join MC in any ch1-sp.
Round 2 – Flowers: [(Ch 3, 1 dc, ch 2, 2 dc) in same ch1-sp, ch 1] – 1st shell made, [(2 dc, ch 2, 2 dc), ch 1] in each of the next 7 ch1-sps. Join round with sl st to top of beg ch-3. (8 shells, 8 ch1-sps)
Do not fasten off and continue with MC.
Round 3 – Petals: Ch 1 (does not count as a st here and throughout), [work 5 dc in next ch2-sp, sc in next ch1-sp] 8 times. Join round with sl st to beg ch-1. (8 petals, 8 sc)
Fasten off and (RS) Join C2 in the blo of the 1st dc of any petal.
Round 4 – Outlining the Background: Ch 1, [work 1 sc blo in each of the 5 dc of the petal, work 1 Lsc in the ch1-sp of Round 2] 8 times. Join round with sl st to the 1st sc. Lsc – see special sts (40 sc, 8 Lsc)
Fasten off and (RS) Join MC again in any Lsc.
(sk 2 sc, sc blo 3) means: sk the 1st 2 sc and work 1 sc blo in each of the last 3 sc of the petal.
Round 5 – Squaring the Motif: (Ch 3, 3 dc, ch 3, 4 dc) in Lsc – 1st corner made, [working in the next petal, (sk 2 sc, sc blo 3), hdc in next Lsc, (sc blo 3, sk 2 sc) in the next petal, (4 dc, ch 3, 4 dc) in next Lsc] 3 times, (sk 2 sc, sc blo 3) in the next petal, hdc in last Lsc, (sc blo 3, sk 2 sc) in the last petal. Join round with sl st to top of beg ch-3. (24 sc, 4 hdc, 4 corners)
Do not fasten off and continue with MC.
Round 6 – Final Square Edging: Ch 2 (counts as 1st hdc), hdc in each of the next 3 dc, [(2 hdc, ch 2, 2 hdc) in ch3-sp, hdc in each of the next 15 dc] 3 times, (2 hdc, ch 2, 2 hdc) in last ch3-sp, hdc in each of the last 11 dc. (60 hdc, 4 corners).
- Join round with an invisible sl st to top of beg ch-2 (see special sts) and fasten off.
- Pm to mark the RS of the square before weaving in all ends.
SMALL GRANNY SQUARES – MAKE 31
- Beg ch-3 counts as 1st dc.
- The rounds are always worked on the RS.
- With MC, start with a magic ring (or ch 4, sl st to first ch to form a ring);
Round 1: (RS) Ch 3 (counts as 1st dc here and throughout), 1 dc in ring, ch 1, [2 dc in ring, ch 1] 3 times. Tighten ring and join round with sl st to top of beg ch-3. (8 dc, 4 ch1-sps)
- Fasten off.
- (RS) Join C2 in any ch1-sp.
Round 2: [(Ch 3, 1 dc, ch 2, 2 dc) in same ch-1 sp, ch 1] – 1st corner made, [(2 dc, ch 2, 2 dc), ch 1] in each of the next 3 ch1-sps. (4 corners, 4 ch1-sps)
- Join round with an invisible sl st to top of beg ch-3 and fasten off.
- Pm to mark the RS of the square before weaving in all ends.
SEAMIN TECHNIQUE
Keep in mind that Lion Brand Rewind is a tape yarn and may tear if pulled too tightly, so be sure to pull gently while seaming the squares.
With the RS facing each other, stack two squares on top of one another.
- Note: While the back loop of the bottom square remains unchanged, the back loop of the top square will be positioned in front of the square.
Using yarn and needle, insert the needle from front to back through the back loops of both squares and pull through. Then, insert the needle from back to front through the next back loops of both squares and pull through.
- Repeat this process to seam the squares together, aligning the stitches on both squares as you go.
4-SQUARE PANEL – MAKE 2
With MC and needle, seam 2 large squares together using the technique from page 7.
Once 2 sets of 2 large squares are seamed, rep process to create a panel of 4 squares.
BORDER
- A border will be done around the 4-square panel.
- (RS) Attach C2 on any corner of the square;
Ch 1, sc evenly along the 4 sides of the 4-square panel (1 sc per st, 1 or 2 sc at the points where 2 squares are joined, and (sc, ch 1, sc) in the corners).
- Join round with an invisible sl st to 1st sc and fasten off.
- Rep for 2nd 4-square panel.
BAND – FOR SIDES AND BOTTOM OF BAG
With C2 and needle, join 15 small squares to create a long band using the technique from page 7.
BLOCKING
- Block to flatten the 4-square panels and the band.
- Do not stretch them out.
SEAMING BAND TO 4-SQUARE PANELS
- Each side will consist of 5 small squares.
- The bottom of the bag will also have 5 small squares.
With the RS facing each other, stack the band (5 squares) on top of one side of a 4-square panel.
- Use st markers at both ends and one in the center to ensure the band and panel are aligned, making sure that the middle small square aligns with the middle seam of the 4- square panel.
With C2, seam the 2 pieces together using the same technique as described on page 7.
Once 1st side is seamed, place markers and repeat the process for the bottom of the bag.
- After finishing the bottom, repeat for the other side.
- Repeat same process for the 2nd 4-square panel.
- Weave in all ends.
BORDER
- A border will be done around the opening of the bag.
- Turn bag so the RS is facing out.
- (RS) Attach C2 at any corner of the opening;
Row 1: (RS) Ch 1, sc around the bag opening (1 sc per st for the panels, 5 sc across each band), sl st to 1st sc.
Row 2: (RS) Rep row 1.
- Fasten off.
STRAP
With C2 and needle, join 16 small squares using the technique from page 7.
- The strap should measure approximately 36″ for a crossbody strap.
- Try on for size, add or remove square/s to adjust length of the strap.
BORDER (Around strap)
- (RS) Attach C2 at the top right of any corner of the strap;
Ch 1, sc evenly along one length of the band (1 sc per st and 1 or 2 sc at the points where 2 squares are joined) at the end of the row, ch 1 and sc the width of the strap;
- Turn strap and rep process for the other sides, sl st to 1st sc.
- Fasten off and weave in ends.
BLOCKING
- Block the strap to flatten it – do not stretch it out.
SEAMING
With C2 and needle, seam each end of the strap to the bag, using the technique from page 7.
- Weave in ends.
INSIDE POCKETS – MAKE 2 (OPTIONAL)
- The pockets measure approximately 8″ W X 5″ H.
Row 1: Starting with a slip knot, ch 28, hdc in 2nd ch from hook and rem chs (pm in 1st st and move up at every row), turn (27) STS
- Remove or add chs to change the width of the pockets, bearing in mind that approximately 3 sts = 1″.
Row 2: Ch 1, hdc across (pm in 1st st and move up at every row).
Rows 3 to 14: Rep row 2.
- Remove or add rows to adjust the height of the pockets, bearing in mind that approximately 3 rows = 1″.
- Fasten off with a long tail for seaming.
- Weave in ends.
SEAMING
- Turn bag inside out.
- Position the pockets where you like to have them and secure with markers.
With yarn and needle, seam pockets on the inside of the bag with a whip st (one on each 4-square panel).
- While seaming, be careful to grab only the yarn on the inside of the bag, ensuring the seaming yarn does not show on the RS of the bag.
More Inspiration
If you enjoyed making the Tigerlily Tote, you may also love the Not So Granny Bag, another fun bag project made with granny squares that offers a more classic granny square look.
For more crochet bag inspiration, take a look at the Chloe Clutch and the Brooklyn Bag, both featuring beautiful wooden handles and stylish designs.
The Delaney Tote is another fun and practical project, also featuring round wooden handles and a quick construction that makes it a satisfying weekend make.
Affiliate Disclosure:
This post may contain affiliate links. If you purchase through these links, I may earn a small commission at no extra cost to you. Thank you for supporting Mermaids & Hooks and helping me continue to create free crochet patterns and tutorials.